核心思路为逆向实现Create Table功能
先进行断点调试查看执行create table的堆栈调用过程:
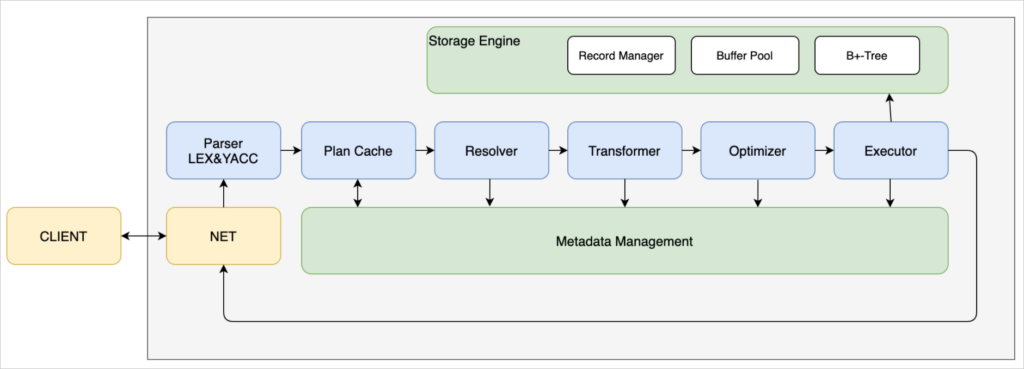
从src/sql下开始:
parse:resolve_stage.cpp
RC ResolveStage::handle_request(SQLStageEvent *sql_event)
rc = Stmt::create_stmt(db, *sql_node, stmt);
stmt:stmt.cpp
RC Stmt::create_stmt(Db *db, ParsedSqlNode &sql_node, Stmt *&stmt)
return CreateTableStmt::create(db, sql_node.create_table, stmt);
stmt:create_table_stmt.cpp
RC CreateTableStmt::create(Db *db, const CreateTableSqlNode &create_table, Stmt *&stmt)
stmt = new CreateTableStmt(create_table.relation_name, create_table.attr_infos);
executor:execute_stage.cpp
RC ExecuteStage::handle_request(SQLStageEvent *sql_event)
rc = command_executor.execute(sql_event);
executor:command_execute.cpp
RC CommandExecutor::execute(SQLStageEvent *sql_event)
return executor.execute(sql_event);
executor:create_table_executor.cpp
RC CreateTableExecutor::execute(SQLStageEvent *sql_event)
RC rc = session->get_current_db()->create_table(table_name, attribute_count, create_table_stmt->attr_infos().data());
而后流转到src/storage
db:db.cpp:RC Db::create_table(const char *table_name, int attribute_count, const AttrInfoSqlNode *attributes)
rc = table->create(table_id, table_file_path.c_str(), table_name, path_.c_str(), attribute_count, attributes);
table:table.cpp:
RC Table::create(int32_t table_id, const char *path, const char *name, const char *base_dir, int attribute_count, const AttrInfoSqlNode attributes[])
Coding
sql部分:添加drop_table_stmt.cpp/.h文件和drop_table_executor.cpp/.h文件并且修改command_executor.cpp和stmt.cpp
storage部分:修改db.cpp/.h,修改table.cpp/.h,修改table_meta.cpp/.h
首先根据调试得出的create table执行流程,先补全SQL处理阶段缺失的drop table执行分支.因此根据堆栈调用所得,首先到stmt文件夹下创建drop_table_stmt.cpp/.h文件,这一部分根据对应的create_table_stmt修改即可,注意两个语句的参数,drop只需要表名,而create还需要列属性,因此需要删减掉attr_infos
drop_table_stmt.h:
#pragma once
#include <string>
#include <vector>
#include "sql/stmt/stmt.h"
class Db;

class DropTableStmt : public Stmt
{
public:
  DropTableStmt(const std::string &table_name) : table_name_(table_name)
  {}
  virtual ~DropTableStmt() = default;
  StmtType type() const override { return StmtType::DROP_TABLE; }

  const std::string   &table_name() const { return table_name_; }
  static RC create(Db *db, const DropTableSqlNode &drop_table, Stmt *&stmt);

private:
  std::string     table_name_;
};
drop_table_stmt.cpp:
#include "sql/stmt/drop_table_stmt.h"
#include "event/sql_debug.h"

RC DropTableStmt::create(Db *db, const DropTableSqlNode &drop_table, Stmt *&stmt)
{
  stmt = new DropTableStmt(drop_table.relation_name);
  sql_debug("drop table statement: table name %s", drop_table.relation_name.c_str());
  return RC::SUCCESS;
}
而后在stmt.cpp添加对应的分支:
case SCF_DROP_TABLE: {
  return DropTableStmt::create(db, sql_node.drop_table, stmt);}
之后来到executor文件夹,添加缺失的drop_table_executor.cpp/.h
drop_table_executor.h
#pragma once

#include "common/rc.h"

class SQLStageEvent;

/**
 * @brief 创建表的执行器
 * @ingroup Executor
 */
class DropTableExecutor
{
public:
  DropTableExecutor()          = default;
  virtual ~DropTableExecutor() = default;

  RC execute(SQLStageEvent *sql_event);
};
drop_table_executor.cpp
#include "sql/executor/drop_table_executor.h"
#include "common/log/log.h"
#include "event/session_event.h"
#include "event/sql_event.h"
#include "session/session.h"
#include "sql/stmt/drop_table_stmt.h"
#include "storage/db/db.h"

RC DropTableExecutor::execute(SQLStageEvent *sql_event)
{
  Stmt    *stmt    = sql_event->stmt();
  Session *session = sql_event->session_event()->session();
  ASSERT(stmt->type() == StmtType::DROP_TABLE,
      "drop table executor can not run this command: %d",
      static_cast<int>(stmt->type()));

  DropTableStmt *drop_table_stmt = static_cast<DropTableStmt *>(stmt);

  const char *table_name = drop_table_stmt->table_name().c_str();
  RC rc = session->get_current_db()->drop_table(table_name);
  return rc;
}
同样的,也需要修改command_executor.cpp来找到对应的stmt分支:
    case StmtType::DROP_TABLE: {
      DropTableExecutor executor;
      return executor.execute(sql_event);
    } break;
完成状态的处理后,就到storage模块开始着手drop table的实现.根据调试可得首先到达db.cpp开始处理,添加drop_table(const char *table_name)方法,注意这个参数与create table不同,同样是因为drop不需要输入列属性.而根据create table语句,可得逆向的drop:
RC Db::drop_table(const char *table_name){

  RC rc = RC::SUCCESS;

  // 查看表是否存在
  auto it = opened_tables_.find(table_name);
  if(it == opened_tables_.end()){
    LOG_WARN("%s has not been opened before.", table_name);
    return RC::SCHEMA_TABLE_NOT_EXIST;
  }

  Table *table = it->second;
  table->drop_all_indexes();

  delete table;
  opened_tables_.erase(it);
  auto table_file_name = table_data_file(path_.c_str(), table_name);
  auto table_meta_name = table_meta_file(path_.c_str(), table_name);
  if (unlink(table_file_name.c_str()) == -1) {
    LOG_ERROR("Failed to delete table (%s) data file %s.", table_name, table_file_name.c_str());
    return RC::IOERR_UNLINK;
  }
  if (unlink(table_meta_name.c_str()) == -1) {
    LOG_ERROR("Failed to delete table (%s) data meta file %s.", table_name, table_meta_name.c_str());
    return RC::IOERR_UNLINK;
  }
  return RC::SUCCESS;
  return rc;
}
而后到达table目录开始处理细节,首先根据上面db.cpp,此处要注意,create table后会得到.table文件和.data文件,而建立索引后也同样会建立相关文件,因此三种文件都需要删除.开始删除所有的索引,table.h此处添加三个辅助函数:
RC drop_index(const char *index_name);
RC drop_index(int idx);
RC drop_all_indexes();
table.cpp
RC Table::drop_index(int idx) {
  assert(idx < (int)indexes_.size());
  string index_name = indexes_[idx]->index_meta().name();
  // 这里的析构函数会把所有buffer里相关的page都刷下去
  delete indexes_[idx];
  indexes_.erase(indexes_.begin() + idx);
  auto index_file_name = table_index_file(base_dir_.c_str(), name(), index_name.c_str());
  if (unlink(index_file_name.c_str()) < 0) {
    LOG_ERROR("failed to remove index file %s while droping index (%s) on table (%s). error=%d:%s",
              index_file_name.c_str(), index_name.c_str(), name(), errno, strerror(errno));
    return RC::IOERR_UNLINK;
  }
  return RC::SUCCESS;
}

RC Table::drop_index(const char *index_name){
  TableMeta new_table_meta(table_meta());
  RC rc=new_table_meta.drop_index(index_name);
  if(rc != RC::SUCCESS){
    LOG_ERROR("Failed to drop index (%s) on table(%s). error=%d:%s", index_name, name(), rc, strrc(rc));
    return rc;
  }
  if (rc != RC::SUCCESS) {
    LOG_ERROR("Failed to edit meta file while droping index (%s) on table (%s). error=%d:%s", index_name, name(), rc,
              strrc(rc));
    return rc;
  }
  for (int i = 0; i < (int)indexes_.size(); i++) {
    if (strcmp(indexes_[i]->index_meta().name(), index_name) == 0) {
      return drop_index(i);
    }
  }
  return RC::SCHEMA_INDEX_NOT_EXIST;
}

RC Table::drop_all_indexes(){
  TableMeta new_table_meta(table_meta());
  RC rc = RC::SUCCESS;
  for (int i = static_cast<int>(indexes_.size()) - 1; i >= 0; i--) {
    rc = new_table_meta.drop_index(indexes_[i]->index_meta().name());
    if (rc != RC::SUCCESS) {
      LOG_ERROR("Failed to drop index (%s) on table(%s). error=%d:%s", indexes_[i]->index_meta().name(), name(), rc,
                strrc(rc));
      return rc;
    }
  }
  if (rc != RC::SUCCESS) {
    LOG_ERROR("Failed to edit meta file while droping all index on table (%s). error=%d:%s", name(), rc, strrc(rc));
    return rc;
  }
  for (int i = static_cast<int>(indexes_.size()) - 1; i >= 0; i--) {
    rc = drop_index(i);
    if (rc != RC::SUCCESS) {
      LOG_ERROR("Failed to drop index %d while droping all index on table (%s). error=%d:%s", i, name(), rc, strrc(rc));
      return rc;
    }
  }
  return RC::SUCCESS;
}
别忘了再删除数据库索引元数据,故table_meta.h同样添加工具函数:
RC drop_index(const char *index_name);table_meta.cpp
RC TableMeta::drop_index(const char *index_name) {
  for (int i = 0; i < (int)indexes_.size(); i++) {
    if (strcmp(indexes_[i].name(), index_name) == 0) {
      indexes_.erase(indexes_.begin() + i);
      return RC::SUCCESS;
    }
  }
  return RC::SCHEMA_INDEX_NOT_EXIST;
}
总结
miniob2023版不需要自己处理词法分析部分的drop table,只需要专注execut阶段的流转和具体的drop实现,因此可以比较容易的参照create table来实现.而需要利用的技巧是学会利用调试,因为miniob对于初学者来说代码量较大,涉及的文件,函数众多,如果不擅用GDB查看堆栈的函数调用很容易绕混,因此擅用GDB单步调试是上手开发Miniob的重要前提.此处的drop实现只是一个简单的参考,若出现错误请各位读者积极指出.
发表回复